Jun 1, 2013

Sometimes, it happens...

Greška na noktima. Priznajem, prošlo je poprilično vremena od kada mi se to desilo :). Nekima od vas će se možda i svideti, ko zna. Uglavnom, ovo ispadne kada nemate konkretnu ideju nego samo lakirate nokte. Nalakirala sam moje sa holo crvenim lakom Catherine Arley #800, i ispečatirala ih sa crnim Miyo - Black i pločicom BM - 204. Sve bi se zaustavilo tu i možda bi mi se i dopalo da sam uspela da ispečatiram nokte ravno. Ali budući da su moji nokti malo zakrivljeni, ovo je bila nemoguća misija. Umesto da sve obrišem i krenem ispočetka sa nečim novim, napravila sam french manikir sa mat crnim lakom theBalm - I Take my Coffee Matte and Black koji je izgledao manje mat nego što je ovaj Miyo - Black (koji ni nije mat uopšte). I na kraju, crvene šljokice u providnoj bazi, Aura - Soul Shade. Ne znam šta mi je sve ovo trebalo :).

Nail fail. I admit, it has been I while since that happened :). Some of you may even like it, who knows. Anyway, this is what you get when you don't have any idea, when you just paint your nails. I painted mine with holo red nail polish Catherine Arley #800, and stamped them with black nail polish Miyo - Black and plate BM - 204. I would stopped it here and maybe I would like it if I could stamp my nails straight. But, since my nails are a little bit curved, that was mission impossible. And instead I removed all of it and start over with something new, I made a french mani with matte nail polish theBalm - I Take my Coffee Matte and Black that looks less matte than Miyo - Black is (this one isn't matte at all). And in the end, red glitter in a clear base, Aura - Soul Shade. I don't know why I needed that :).


black and red french manicure with stamping
black and red french manicure with stamping 2
black and red french manicure with stamping 3
black and red french manicure with stamping 4
black and red french manicure with stamping 5

Šta vi mislite? Koliko je loše? 

What do you think? How bad is it?

May 31, 2013

Dry Flowers on Nails

Danas za vas imam sušeno cveće koje sam dobila na recenziju od Born Pretty Store-a. Obožavam sve što se može staviti na nokte, a ovo je drugo sušeno cveće koje imam. Prve nikada nisam isprobala (nikako da stigne na red) ali su drugačiji od ovih, 3D su. U ovoj kutijici, dobijete 12 različitih boja sušenog presovanog cveća, a od svakog imate po 3 komada. 

Today I have for you review of dry flowers that I got from Born Pretty Store. I love everything that I can attach to my nails, and this is the second dry flower set that I have. First one I never tried (it is never it's turn) but they are different from this set, they are 3D. In this box, you get 12 different colors of pressed dry flowers, 3 pieces of each color. 

born pretty store dry flowers in box

Cveće se lako lepi za nokte, ali ima običaj da se podiže. Ništa što dva sloja top coat-a nisu mogla da reše. Pod prstima ga možete osetiti ali nije jako ispupčeno. U svakom slučaju, lep nail art je nastao a upotrebila sam samo 4 parčića sušenog cveća. Ispod cveća, bazni lak je Miyo - Lemon.

Flowers are easy to attach, although sometimes it can start lifting. Nothing that two coats of top coat couldn't solve. You can feel it with your fingers but not too much. Anyway, I made nice nail art and I only used 4 pieces of dry flower. Under the flower, base color is Miyo - Lemon. 

born pretty store dry flowers
born pretty store dry flowers 2
born pretty store dry flowers 3
born pretty store dry flowers 4
born pretty store dry flowers 5

Da li vam se dopada sušeno cveće na noktima? Moj favorit su narandžasta, jer imaju te sitne male latice koje su baš vidljive. 
Ovaj set sušenog cveća, možete naći na stranici Born Pretty Store. Ukupno dobijete 36 komada sušenog cveća za nekih 300 dinara. Naravno, možete dobiti i 10% popusta ako iskoristite kod : KQL91. 

Do you like dry flowers on nails? My favorite is orange one, because it has those tiny petals that are really visible. 
This set of dry flowers, you can find on Born Pretty Store. You get 36 pieces of dry flower for $3.48. Of course, you can also get 10% off if you use coupon code : KQL91. 


This review contains a product sent to me by the company’s PR for my review. I do not accept compensation for reviews and all my opinions are honest and objective.For more information, please read my Disclosure Policy.

May 30, 2013

Uncle Scrooge is Fishing for Money

Priznajem, često brojim moje pare :). I volim to da radim. Ne radim to da bi znala koliko ih imam (tu informaciju brzo zaboravim) nego jednostavno volim da znam da ih imam :D. I skoro svaki put kada brojim pare, setim se Baje Patka. On je obožavao samo da sedi na svojim parama i broji ih. Srećom, nisam škrtica kao on :D. Kada bih imala toliko para kao on, ne znam šta bi pre kupila, ali sigurna sam da ih ne bi čuvala. Možda još koji lak za nokte? :).
Za ovaj nail art, koristila sam : Essence - Did Someone Say Nude?, Essence - Divalicious Red i akrilne boje.

I admit, I count my money often :). And I love to do it. I don't do it because I want to know how much I have (I forget that information quickly), I just love to know that I have them :D. And almost every time I count money, I remember Uncle Scrooge. He loved to sit on his money and count them. Luckily, I'm not miser like he is :D. When I would have that amount of money that he does, I don't know what would I buy first, but I'm sure that I wouldn't just keep it. Maybe few more bottles of nail polish? :)
For this nail art, I used : Essence - Did Someone Say Nude?, Essence - Divalicious Red and acrylic paints. 

uncle scrooge nail art
uncle scrooge nail art 2 uncle scrooge nail art 3
uncle scrooge nail art 4
uncle scrooge nail art 5

Šta bi vi radile sa neograničenom svotom novca? 

What would you do with unlimited amount of money?

May 29, 2013

Nail Foil Tutorial

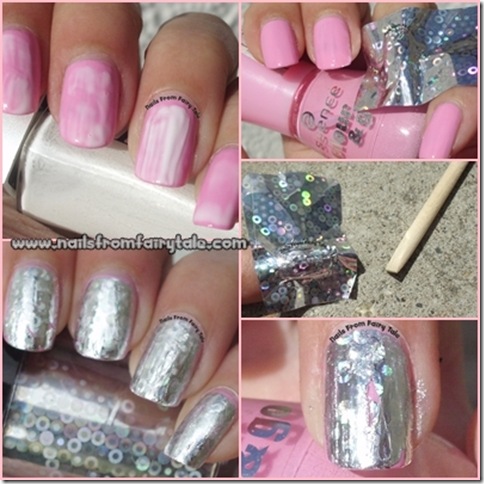
Pre par dana, kada sam se prvi put našla pored folije za nokte, mislila sam da će proces stavljanja biti dugačak i naporan. Ali potpuno sam pogrešila. Zato danas za vas imam tutorijal stavljanja folije na nokte, kako bi vam pokazala koliko je lako i koliko malo vremena vam treba :).
Za ovo sam iskoristila foliju za nokte koja mi je stigla od kkcenterhk na recenziju :). Prvo ću vam pokazati kako sve to na kraju izgleda, a onda možemo korak po korak...

Few days ago, when I used a nail foil for the first time, I thought that process of applying it will be long and hard. But I was wrong. That's why I have a tutorial for you about how to apply nail foil, to show you how easy it is :). 
For this I used nail foil that I got from kkcenterhk for review :). First I'm going to show you how it all looks in the end, and then we can go step by step...

nail foil tutorial final look

Osim bazne boje, koja može biti koja god želite, trebaće vam (naravno) folija za nokte, lepak za nokte, i drveni štapić. 

Except the base color, which can be anything you like, you will need (of course) nail foil, nail glue and orange wood stick. 

what do you need
Možda nisam trebala izabrati Essence - Free Hugs kao baznu boju, jer je previše roz a folija je srebrna. Preporučujem vam da vaš izbor bude boja koja je malo sličnija foliji. 

Maybe I shouldn't pick Essence - Free Hugs as a base color because it is too much pink, and foil is silver. I recommend using a base color that is similar with a foil color. 
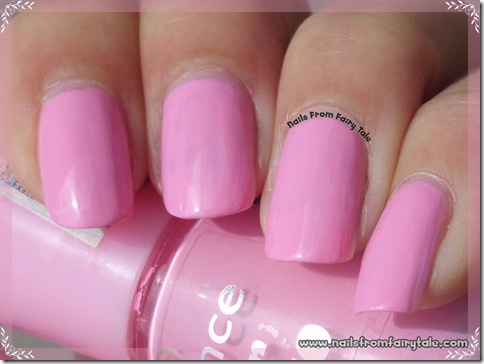
Essence - Free Hugs

Nanesite lepak na nokte, i sačekajte da se osuši. Za to će biti potrebno manje od 5 minuta, a shvatićete da je suv kada postane providan (na slici je još uvek beo). 

Paint your nails with glue, and wait for it to dry. It will need less than 5 minutes, and you will know that it is dried when it becomes transparent (on picture, it is still white). 

nail foil tutorial step 2 glue

Stavite malo parče folije na nokat. Ovde ćete već primetiti da je folija potpuno zalepljena i ne mrda. 

Place a piece of foil on your nail. Here you will notice that foil is on one place and can't move.

nail foil tutorial step 3 apply foil
Sledeći korak je da uzmete drveni štapić i grebete po noktu, kako bi pričvrstili foliju. Grebite ga sa svih strana kako bi ostala ravna površina. Ako nemate ovakav štapić možete iskoristiti i nokat (nemojte onaj koji ste premazali već lepkom :D).

Next step is to take orange wood stick and scratch your nails to glue the foil. Scratch is from all sides so you can have flat surface. If you don't have this kind of wood stick you can also use your nail (don't use the one that have glue on it :D).

nail foil tutorial step 4 scratch foil

Možete odlepiti foliju, i primetićete da onaj deo koji ste grebali više nije na foliji nego na noktu. Ukoliko vam ostane praznih mesta (kao što je meni na ovom noktu) možete opet samo prelepiti foliju, zagrebati, i skinuti. Na kraju vam ostaje samo da očistite ostatke folije sa prstiju :).

You can take off the foil, and you will notice that the part that you scratched isn't on a foil anymore, it is on your nail. If you have bold spots (like I have on this nail) you can just put the same foil again, scratch it and take it off. In the end, all you need to do is clean foil that is on your fingers :). 

nail foil tutorial step 5 remove  foil

A evo i kako sve to izgleda na kraju...

And here it is how it all looks in the end...
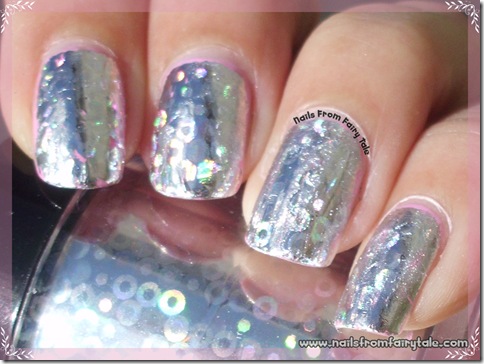
nail foil tutorial final look 2
nail foil tutorial final look 3
nail foil tutorial final look 4
tutorial nail foil

Za obe ruke, trebaće vam oko pola sata :). Da li ste probale da stavljate foliju na nokte? Da li vam se dopada?
Ovakvu foliju možete naći na sajtu kkcenterhk zajedno sa još mnogo raznih stvarčica za nail art. Ova folija košta oko 650 dinara, a možete dobiti i 10% popusta sa kodom : nailsfromfairytale .

For both hands, you will need about half an hour :). Have you tried to use nail foil? Do you like it?
This foil you can find on webpage kkcenterhk with many other different nail art accessories. This foil is $7.69, and you can get 10% off if you use coupon code : nailsfromfairytale .

This review contains a product sent to me by the company’s PR for my review. I do not accept compensation for reviews and all my opinions are honest and objective.For more information, please read my Disclosure Policy.

May 28, 2013

Stamping and Dotting

Ponekad, kada nemate baš inspiracije, pečatiranje vaših noktiju je savršeno rešenje. Pomoću njega, čak možete napraviti i nešto potpuno neobično i za vas neočekivano. Moj dan danas, počeo je sa lakiranjem ovog koralnog laka theBalm - Coral Reef-ined. Nisam imala inspiraciju za nikakvo crtanje, a tek par sati kasnije, setila sam se mojih Bundle Monster pločica koje nisam koristila već neko vreme. Napokon, nakon milion puta promenjenog mišljenja, izabrala sam uzorak sa pločice BM - 209 i lak Miyo - Black. Prošlo je malo više od sat vremena, kada su mi se moji nokti učinili dosadnim, pa sam crne tačkice promenila u šarene. A evo i koje sam sve lakove upotrebila za to : Catrice - Easy Peasy Lemon Squeezy, Catherine Arley #08, theBalm - Hella Yella, Essence - Date Me, Essence - Divalicious Red, theBalm - Lilac Any Sence i theBalm - Magenta Disposition. 

Sometimes, when you feel uninspired, stamping your nails is a perfect solution. With it, you can even make something completely oddly and for you unexpected. My day started with painting my nails with theBalm - Coral Reef-ined. I didn't have inspiration for drawing, and few hours later, I remembered my Bundle Monster plates that I haven't used for a while. Finally, after I changed my mind for about a million times, I chose pattern from plate BM - 209 and nail polish Miyo - Black. More than an hour later, I thought about how boring my nails are, so I changed black dots into rainbow dots. And here is the list of all polishes that I used for it : Catrice - Easy Peasy Lemon Squeezy, Catherine Arley #08, theBalm - Hella Yella, Essence - Date Me, Essence - Divalicious Red, theBalm - Lilac Any Sence and theBalm - Magenta Disposition. 

colorfull dots
colorfull dots 2
colorfull dots 3
colorfull dots 4
colorfull dots 5

Šta vi pravite na noktima kada nemate inspiraciju?

What do you do with your nails when you are uninspired?